
How Does Water Move Through a Roof and Into a Home?
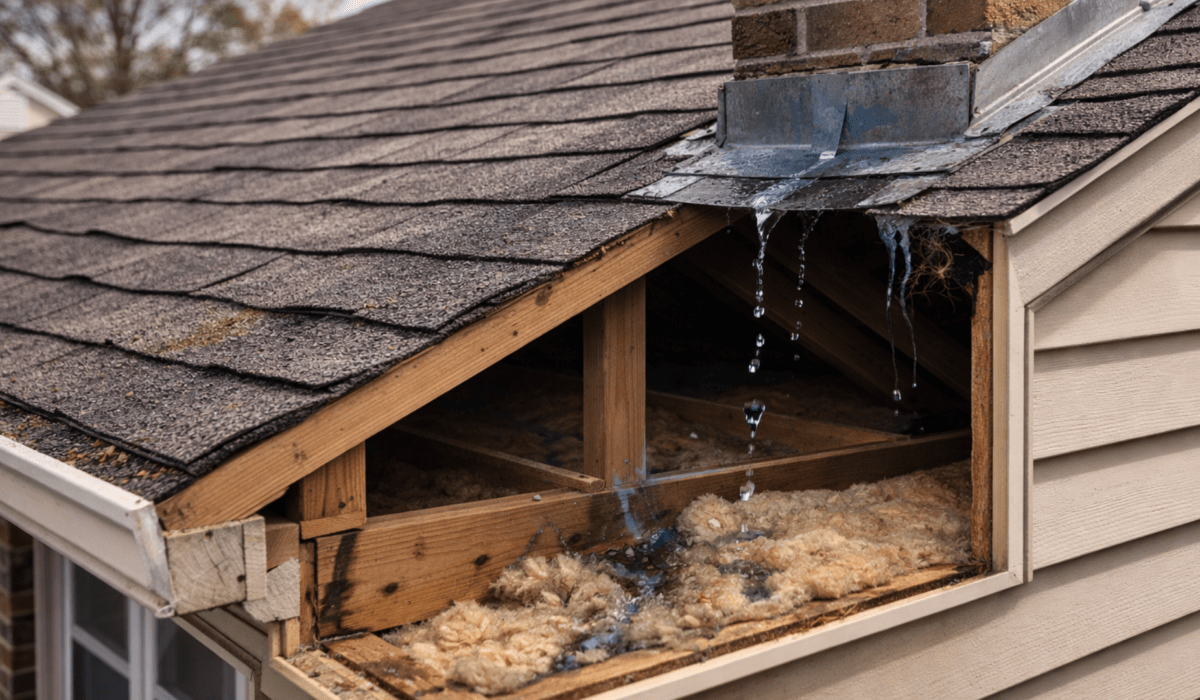
Water enters a roof at gaps, failed joints, and compromised components — then travels along the path of least resistance through the roofing system before appearing inside the home. The entry point and the appearance point are almost never the same location. Understanding how water moves explains why roof leaks are so frequently misdiagnosed, why interior damage often underrepresents what has happened structurally, and why finding the actual source requires systematic inspection rather than working backward from where the water appears.
Water entering a roof does not always drip straight down — it often travels along decking and structural components before becoming visible inside the home.
Key Takeaways
- Water enters roofs at joints, transitions, and failed components — rarely through intact shingle surfaces
- Once inside the roof system, water follows structural members, insulation, and gravity — traveling several feet or more before dripping into living space
- The interior stain or wet spot is almost never directly below the entry point
- Slow, hidden water movement causes cumulative structural damage that is not visible until it is already significant
- South Jersey’s seasonal storms, wind-driven rain, and freeze-thaw cycles create specific water entry patterns that differ from ordinary rainfall
Homeowners dealing with a roof leak focus on two things: where the water is appearing inside and where something looks wrong on the roof outside. The logical assumption is that these two points are connected in a straight line. They almost never are.
Water is patient and indifferent to straight lines. It finds openings, follows surfaces, and travels wherever gravity and the path of least resistance take it. On a roof over a South Jersey home, that path is shaped by rafters, sheathing, insulation, vapor barriers, and ceiling materials — each one redirecting water in ways that make the interior appearance point a poor guide to the actual entry point.
Understanding how water actually moves through a roof — not how most people assume it moves — is foundational to diagnosing leaks accurately and understanding why professional inspection matters.
How Does Water Get Through a Roof?
Water usually enters a home through weak points in the roofing system, not directly through the middle of the roof. Common entry points include damaged shingles, worn flashing, roof valleys, pipe boots, chimneys, skylights, clogged gutters, and areas where wind-driven rain can push beneath loose materials. A roof inspection can help find the source before water spreads into insulation, decking, ceilings, or walls.
Step One: How Water Finds an Entry Point
Water does not simply pass through intact roofing materials. Asphalt shingles, underlayment, and properly installed roofing components are designed to shed water across their surfaces rather than absorb it. Under normal conditions and in good repair, they do exactly that.
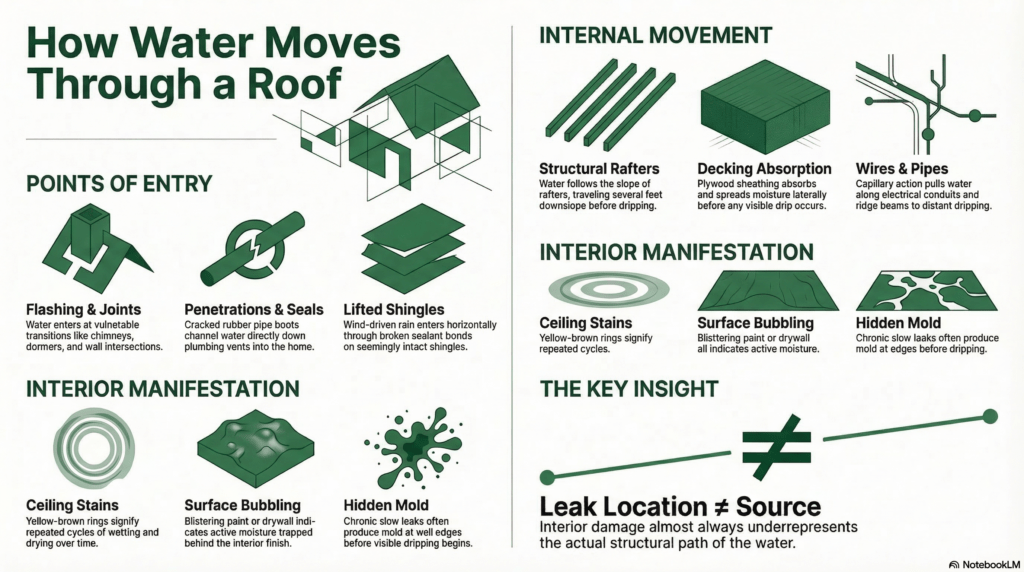
Water enters when that continuity breaks down — at gaps, failed seals, and compromised transitions. The most common entry points on South Jersey homes are:
Flashing joints at chimneys, walls, and dormers.
These transitions are where two different materials or planes meet, and they are where roofing systems are most vulnerable. A separated counter flashing, a deteriorated step flashing sequence, or dried sealant at a chimney base creates an opening that may be a fraction of an inch wide but allows water entry during every rain event that reaches it.
Failed pipe boots and penetration seals.
The rubber collar around a plumbing vent pipe that has cracked or split creates a gap that channels water directly down the pipe and into the structure below. Because water follows the pipe rather than falling straight to the attic floor, the entry and travel path can be difficult to trace without systematic inspection.
Wind-lifted shingles with broken sealant bonds.
A shingle that has been lifted by wind and returned to approximate position may look intact from the ground. But if the sealant strip below it has broken, there is now an unsealed lap joint that allows wind-driven rain to enter horizontally beneath the shingle course during storms with directional wind.
Valley failures.
Roof valleys concentrate water from large surface areas into a single channel during every rain event. Worn or corroded valley flashing, or thinned valley shingles in a closed installation, develops gaps at the center of the channel where water pressure and volume are highest.
Open or deteriorated roof edges.
Missing or corroded drip edge at the eaves allows water to migrate behind the gutter and against the fascia. Ice dams in winter create temporary barriers that force meltwater backward under the first courses of shingles — entry points that only exist under specific seasonal conditions.
Step Two: How Water Moves Through the Roof Assembly
Once water passes the outer surface, it enters the roof assembly — the layered system of underlayment, decking, insulation, vapor barriers, and framing between the exterior surface and the interior ceiling. What happens next is governed entirely by physics.
Water Follows the Slope of Structural Members
Rafters run at the same angle as the roof slope. Water that enters at a gap flows onto the nearest rafter and runs downslope along its surface. Depending on where the entry point is relative to the nearest rafter, the water may immediately begin traveling several feet down toward the eaves before finding a low point or saturated area where it drips.
This is the primary reason the interior appearance point is almost always displaced horizontally from the entry point. A flashing failure at a chimney on the upper portion of a roof slope may produce a ceiling stain ten or twelve feet downslope — well into the middle of the room beneath, nowhere near the chimney wall.
Water Transfers Across Sheathing and Decking
When the volume of water entering exceeds what a single rafter can channel, or when the rafter surface becomes saturated, water spreads laterally across the sheathing. Plywood and OSB decking absorb water into their structure before it drips — which means significant moisture can accumulate within the decking material itself before any evidence appears at the ceiling below.
This is one of the most consequential aspects of how water moves through a roof. Decking that has absorbed and dried repeatedly across multiple seasons develops progressive structural degradation — softening, delamination, and eventually rot — without producing obvious interior evidence during the early stages. By the time a homeowner notices a soft spot or visible sag, the decking has typically been compromised for considerably longer than the visible evidence suggests.
Water Moves Along Pipes, Wires, and Framing
Any penetration through the roof — a pipe, an electrical conduit, a ridge beam — provides a pathway that water follows by capillary action or gravity well beyond the immediate entry area. Water entering around a pipe boot at the roof surface follows the pipe downward through the attic, potentially reaching the ceiling many feet from the penetration point.
This is why post-storm leaks sometimes appear at ceiling light fixtures, outlets, or other locations that seem entirely unconnected to the roof. The water traveled along a wire or conduit from an entry point that would not be obvious without tracing the path.
Water Pools at Thermal and Vapor Barriers
Insulation and vapor barriers installed across the attic floor change water’s movement pattern significantly. When water dripping from a rafter or sheathing reaches an insulation layer, it spreads horizontally across the insulation rather than continuing straight down. The moisture distributes over a wider area, saturating insulation and reducing its thermal effectiveness, before finding a gap or low point to pass through to the ceiling below.
This horizontal spread at the insulation layer is another reason interior staining appears displaced from the actual entry point — and why the area of apparent ceiling damage often underrepresents how widely moisture has actually spread within the insulation above it.
Step Three: How Water Finally Appears Inside
After traveling through the roof assembly, water reaches the ceiling or wall surface through several mechanisms depending on construction type and the volume of water involved.
Dripping at low points and gaps.
Water that has traveled along rafters or pooled above the ceiling eventually finds a gap — at a light fixture, a junction box, a ceiling seam, or simply a low point where it has saturated the drywall or plaster to the point of dripping through.
Staining without active dripping.
Slower, smaller volumes of water that never accumulate enough to drip nevertheless saturate ceiling or wall materials over time. The result is discoloration — the familiar yellow-brown water stain ring — that appears without any active dripping. Staining of this kind often represents repeated cycles of wetting and partial drying across multiple rain events, indicating the entry has been present longer than a single storm.
Blistering and bubbling paint or drywall.
When water saturates the paper facing of drywall or reaches paint on a ceiling surface, it causes the surface material to separate from the substrate. Bubbling paint on a ceiling is a reliable indicator of active or recent moisture above it.
Mold and mildew growth at wall or ceiling edges.
Chronic slow moisture — from a consistently leaking flashing joint or a failed pipe boot that allows small volumes of water in during every rain — may produce mold growth at wall and ceiling edges before producing visible staining. The mold grows at the point where moisture migrates to the interior surface, which may be some distance from the actual entry and travel path.
How South Jersey’s Climate Shapes Water Entry Patterns
The way water enters and moves through South Jersey roofs is not identical to how it behaves in every climate. Local weather patterns create specific entry and movement conditions that are worth understanding.
Wind-driven rain from Nor’easters and coastal storms arrives at steep angles that force water into gaps that vertical rainfall would not reach. Flashing separations, lap joint gaps, and edge conditions that perform adequately in calm rain become active entry points when rain is driven horizontally by sustained winds. This is why many South Jersey homeowners experience leaks only during specific storm conditions — the entry point exists year-round, but only certain weather exposes it.
Freeze-thaw cycles in winter create ice dams at the roof’s lower edge when heat escaping through inadequately insulated attic space melts snow on the upper roof. The meltwater runs downslope to the cold eave area, where it refreezes. As the ice barrier builds, subsequent meltwater has nowhere to go — it backs up under the first shingle courses and enters the roof assembly at the lower edge. Ice dam water entry produces ceiling staining near exterior walls at the eaves rather than in the middle of the ceiling, which is a useful location clue during winter and early spring inspections.
Summer humidity and heat drive vapor movement through the roof assembly from inside the home outward. In homes where vapor management between the conditioned living space and the unconditioned attic is inadequate, humid interior air reaches the cooler decking surface and condenses. This condensation is not a roof leak in the traditional sense — water is not entering from outside — but it produces moisture damage to decking, framing, and insulation that looks identical to leak damage from the interior. Distinguishing between condensation-driven moisture and infiltration-driven moisture is one of the reasons attic inspection is a necessary component of any thorough roof evaluation.
Heavy sustained rainfall from summer thunderstorms produces the highest water volume in the shortest period. Flashing joints and valley systems that manage moderate rain adequately may be overwhelmed during sustained heavy events, producing leaks that appear only when rainfall intensity exceeds a threshold. Homeowners sometimes describe these leaks as appearing only in “really bad” storms — which is a useful indicator that the roof system is functioning marginally rather than failing completely.
Why This Matters for Diagnosis and Repair
Everything above has a direct practical implication: accurately tracing a roof leak to its source requires following the water’s actual path, not assuming a straight-line connection between the interior stain and the exterior entry.
Working backward from interior staining alone is insufficient.
The stain tells you water has arrived at that location. It does not tell you where the water entered or what path it took to get there.
Looking only at what is visibly wrong from the yard is insufficient.
A missing shingle visible from the driveway may be unrelated to a ceiling stain near the chimney. A roof that appears intact from the ground may have a failed pipe boot or separated step flashing that is the actual source.
Applying sealant to visible gaps without tracing the full path is a temporary measure.
If the gap that received caulk is not the actual entry point — or if it is one of several entry points — water continues entering through the unaddressed paths.
A systematic inspection traces every potential entry point in the area indicated by interior evidence, evaluates each flashing assembly and penetration in the relevant section of the roof, and correlates exterior findings with attic conditions to identify the actual source with confidence.
This approach takes more time than looking for the most obvious problem and addressing it. It also produces repairs that actually work.
What Hidden Water Damage Can Look Like Over Time
Because water moves and accumulates before becoming visible, the structural damage that results from a slow leak often exceeds what interior signs suggest. In South Jersey homes where a flashing failure or failed pipe boot has been admitting water for several seasons, contractors commonly find:
- Decking that has softened or begun to delaminate well beyond the area of visible interior staining
- Rafters with surface mold or early rot at points along the water’s travel path, not just at the entry
- Insulation that has been saturated and partially dried multiple times, reducing its R-value significantly while appearing intact from below
- Fascia and soffit deterioration from water that reached the roof edge and migrated into those components
None of these conditions are visible from the ceiling stain that prompted the call. They are found during inspection — and addressing them as part of a repair is what prevents the damage from continuing to spread after the entry point is sealed.
Download this PDF – Anatomy of a Roof Leak
Frequently Asked Questions
Why does my ceiling stain appear so far from the chimney or vent that is probably causing the leak? Water follows structural members — rafters, sheathing, framing — downslope from the entry point before finding a low point to drip through. A few feet of travel is common. Ten feet or more is not unusual depending on roof slope and framing layout.
Can a roof leak cause damage without ever dripping into the living space? Yes. Slow moisture entry that saturates decking and insulation without dripping through the ceiling causes structural damage over time without any visible interior evidence. This is why inspections that include attic access are valuable even when there is no visible leak.
Why does my leak only happen during certain storms? Wind-driven rain, sustained heavy rainfall, or ice damming expose entry points that ordinary rainfall does not reach or pressurize. A leak that only occurs in specific weather conditions typically indicates a marginal gap or failed seal rather than a catastrophic shingle failure.
I patched what looked like the problem but the leak came back. Why? Either the patch addressed a symptom rather than the actual entry point, or there are multiple entry points and only one was addressed. Water will continue entering through any unaddressed path regardless of what was patched elsewhere.
How much damage can a slow roof leak cause before it becomes visible? Significant damage to decking, insulation, and framing can accumulate over multiple seasons before interior staining or dripping appears. The visible interior sign is often a late-stage indicator rather than an early one.
What to Do With This Information
If your South Jersey home has an active leak, a ceiling stain, or a roof that is 15 years or older without a recent professional evaluation, a systematic inspection is the right starting point. Understanding how water moves makes clear why the inspection needs to evaluate the full system — not just the most obvious visible problem.
T.A. Hughes III Roofing offers free, no-obligation roof inspections for homeowners throughout Burlington, Camden, and Gloucester Counties.
T.A. Hughes III Roofing is a family-owned exterior remodeling contractor serving South Jersey for over 45 years. The company is fully licensed and insured in the State of New Jersey and holds GAF Certified Roofing Contractor status.