What Is Roof Flashing?
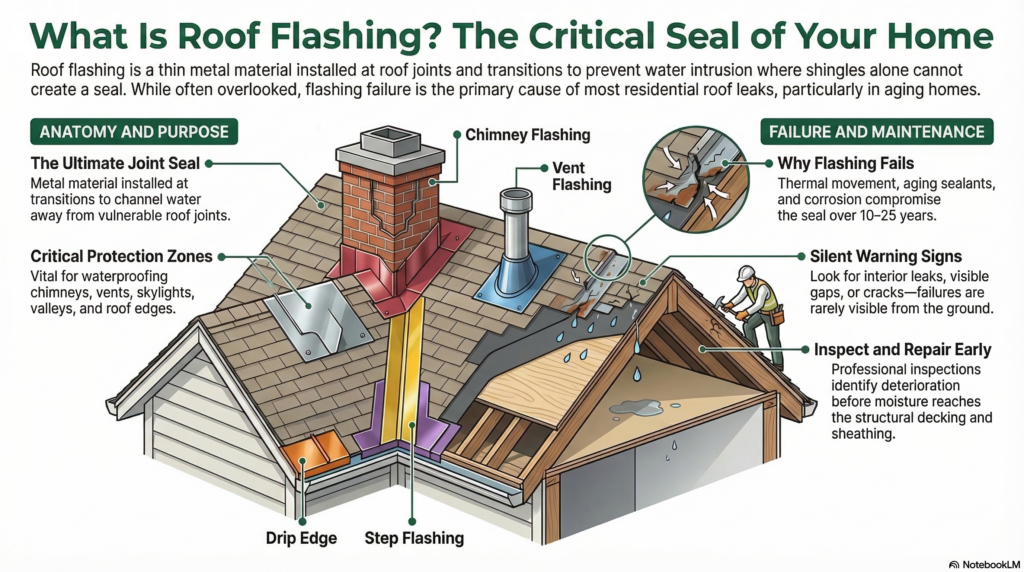
Roof flashing is the metal material installed at joints, transitions, and penetrations across a roofing system to prevent water from entering where shingles alone cannot create a reliable seal. It is found at chimneys, walls, valleys, vents, skylights, and roof edges. Flashing is one of the most critical components of any roofing system — and one of the most common sources of leaks on aging homes in South Jersey.
Roof flashing is the material that seals the joints where a roof meets vertical surfaces like chimneys and vents, preventing water from entering the home.
Key Takeaways
- Flashing protects the joints and transitions in a roofing system where water is most likely to enter
- It is found at chimneys, walls, valleys, skylights, vents, and roof edges
- Flashing fails through corrosion, sealant deterioration, movement, and improper installation — often long before surrounding shingles show wear
- Most roof leaks on South Jersey homes originate at failed flashing, not at the shingle surface
- Flashing failures are not always visible from the ground — a professional inspection is the only reliable way to assess their condition
When a roof leaks, homeowners typically look up and look for missing or damaged shingles. That instinct is understandable — shingles are what you can see. But in practice, the majority of roof leaks on homes in Burlington, Camden, and Gloucester Counties trace back to flashing, not shingles.
Understanding what flashing is, where it is, and how it fails gives homeowners a much more accurate picture of what is actually protecting their home — and what warrants attention as a roof ages.
What Flashing Does and Why It Exists
Shingles are excellent at shedding water across a continuous, uninterrupted surface. The problem is that most roofs are not continuous and uninterrupted. They have chimneys passing through them. They meet walls and dormers. They have valleys where two planes converge. They have pipes, vents, and skylights penetrating the surface.
At every one of these locations, there is a joint — a point where two different materials or planes meet. Joints are where water enters. No shingle can seal around a chimney or wrap a valley reliably on its own.
Flashing is the purpose-built solution to that problem. It is typically made from aluminum, galvanized steel, or lead-coated copper and is installed to create a continuous, layered barrier at every transition and penetration on the roof. Done correctly, it channels water away from the joint and back onto the shingle surface, where it drains off the roof as intended.
Done incorrectly — or left to age past its useful life — it becomes the primary entry point for water.
Where Flashing Is Located on a Roof
Understanding where flashing lives helps homeowners understand why it matters in so many different leak scenarios.
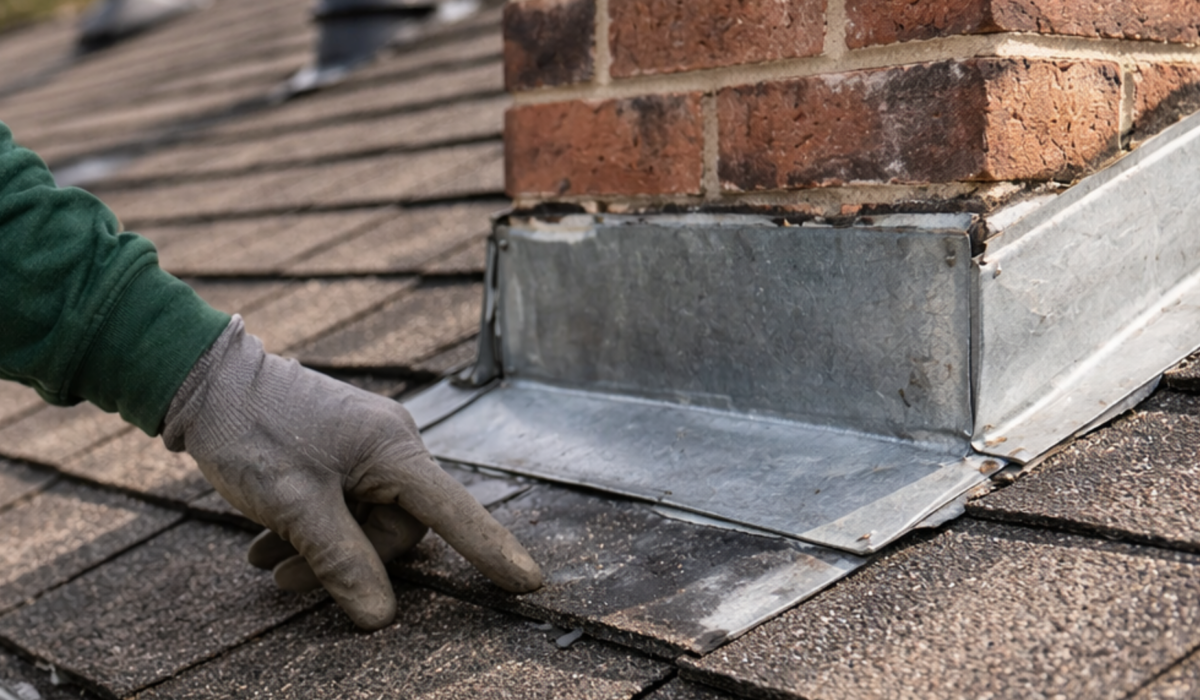
Chimney flashing is the most complex flashing assembly on most residential roofs. It involves multiple interlocking components — base flashing at the bottom of the chimney, step flashing up the sides, counter flashing embedded into the masonry, and often a saddle or cricket on the high side of the chimney to divert water around it. Each component can fail independently.
Step flashing at walls and dormers is the series of small L-shaped metal pieces that create a waterproof transition wherever a roof plane meets a vertical wall surface — at dormers, at the wall of the house above a garage roof, at additions. Step flashing works in layers with the siding or cladding above it. When either component fails, water enters at the joint.
Valley flashing lines the channels where two roof slopes meet. Valleys concentrate water from large areas of the roof into a single channel, putting sustained stress on whatever material lines them during every rain event.
Drip edge runs along the lower edges of the roof — at the eaves and rakes — to direct water away from the fascia board and into the gutter system. It is frequently overlooked but plays a direct role in preventing fascia rot and water infiltration at the roof’s perimeter.
Pipe boot flashing seals around plumbing vent pipes where they exit through the roof. While the collar component is often rubber or neoprene rather than metal, it functions as part of the flashing system and fails on a similar timeline to other sealant-dependent components.
Skylight flashing frames all four sides of a skylight opening where it penetrates the roof. Both the curb-mounted flashing and the head flashing above the skylight are vulnerable to separation, corrosion, and sealant failure over time.
Vent and fan flashing seals around exhaust vents, attic fans, and other roof penetrations. These are typically smaller in scale but fail in the same ways as larger flashing assemblies — through sealant degradation and material movement.
Why Flashing Fails Over Time
Flashing does not fail all at once. It deteriorates through several overlapping mechanisms, and understanding them helps explain why flashing problems are so common on South Jersey homes from the 1980s and 1990s.
Sealant Deterioration
Most flashing installations rely on sealant — roofing caulk, butyl tape, or similar materials — to bridge small gaps, seal counter flashing edges, and secure termination points. This is not a shortcut. It is a standard part of how flashing systems are designed.
The problem is that sealants have a shorter lifespan than the metal they protect. In South Jersey’s climate — with hot summers, cold winters, and regular freeze-thaw cycling — roofing sealants commonly begin to dry, shrink, and crack within 5 to 10 years. On a roof that is 20 or 25 years old, original sealants at flashing transitions have almost universally reached a state of significant deterioration.
When sealant fails, the gap it was bridging is exposed. Water enters during rain, often slowly and without an obvious interior sign at first.
Thermal Movement and Metal Fatigue
Metal expands and contracts with temperature. In South Jersey, the temperature range a roof experiences between a January night and an August afternoon is significant — easily 100 degrees Fahrenheit or more across the seasons.
Over years of daily and seasonal thermal cycling, metal flashing moves. Fasteners loosen. Lapped joints shift. Material that was tight against a surface develops gaps. This is not a sign of poor installation — it is the physical reality of metal roofing components operating across extreme temperature ranges over decades.
Chimney flashing and step flashing are particularly vulnerable to this because they connect metal to masonry or wood — materials that move at different rates. The interface between them is where gaps develop as each material expands and contracts independently.
Corrosion and Rust
Galvanized steel flashing — the most common type installed on South Jersey homes through the 1980s and 1990s — is coated with a layer of zinc that provides corrosion resistance. That zinc coating does not last indefinitely. Once it is depleted, typically after 20 to 30 years of weather exposure, the steel beneath begins to rust.
Rust development on flashing does not announce itself immediately. It begins as surface oxidation, progresses to pitting, and eventually develops pinhole perforations through which water enters. By the time rust staining is visible on interior surfaces, the corrosion has typically been underway for years.
On homes from the 1980s and 1990s in Burlington, Camden, and Gloucester Counties, original galvanized steel flashing is now well within the age range where corrosion is a consistent inspection finding.
Improper Installation
Not all flashing failures are age-related. Improper installation creates conditions for early failure regardless of material quality.
Common installation errors that lead to premature flashing failure include:
Relying entirely on sealant where mechanical fastening and proper layering are required. A bead of caulk applied over a gap in chimney counter flashing is a temporary patch, not a repair. It addresses the visible gap without correcting the underlying assembly problem.
Incorrect step flashing sequencing. Step flashing must be integrated with siding and shingles in the correct layered order — each piece overlapping the one below it in the direction of water flow. When the sequence is wrong, water finds a path through the layers rather than being shed across them.
Insufficient overlap at lapped joints. Metal flashing pieces that overlap each other must do so by a minimum amount to remain watertight as they move. Insufficient overlap is a latent failure that often takes several years to manifest.
Using the wrong material. Dissimilar metals in contact accelerate corrosion through galvanic action. Aluminum flashing in contact with copper or certain treated woods will corrode faster than the material’s rated lifespan would suggest.
These installation issues are particularly common where repairs or partial re-roofing was done over the years by contractors who applied sealant over existing problems rather than correcting the flashing assembly.
Physical Damage From Storm Events
South Jersey’s storm history — Nor’easters, summer thunderstorms with high winds, occasional ice events — creates physical stress on flashing that accelerates failure.
High winds can lift counter flashing away from masonry, shift step flashing pieces out of their layered position, and pull drip edge away from the fascia. Even when a storm does not cause obvious visible damage, the cumulative physical stress of multiple significant weather events over decades takes a toll on flashing connections and overlaps.
After any storm with sustained high winds in South Jersey, flashing condition is one of the first things a professional inspection evaluates — because damage to these components often exists without any visible shingle loss above them.
Why Flashing Leaks Are Hard to Locate Without an Inspection
Flashing failures are notoriously difficult to diagnose without getting on the roof because of how water moves once it enters a joint.
Water that enters at a chimney flashing gap does not necessarily drop straight down and appear on the ceiling directly below the chimney. It follows the path of least resistance — along rafters, down sheathing, across insulation — sometimes traveling several feet horizontally before finding a point where it drips into the living space below.
This is why homeowners and less experienced contractors sometimes misidentify the source of a flashing leak. The interior stain appears in one location. The actual entry point is somewhere else. Without systematically evaluating every flashing assembly on the roof, the source remains uncertain.
A thorough professional inspection traces the potential entry points rather than working backward from where the leak appears inside.
Repair vs. Replacement: What Flashing Condition Determines
Flashing failures are among the most repairable problems on an aging roof — when they are caught before moisture has caused secondary damage.
Targeted repair is often appropriate when:
- A specific flashing assembly has failed while the surrounding roof system remains sound
- The failure is at a sealant joint that can be properly re-flashed rather than just re-caulked
- The metal itself is not severely corroded and still has structural integrity
- The shingle field is in reasonable condition with years of useful life remaining
More comprehensive attention is warranted when:
- Multiple flashing assemblies are failing simultaneously, indicating the system has aged past the point where individual repairs are cost-effective
- Corrosion has progressed to the point where metal integrity is compromised
- Moisture from a flashing failure has reached the decking, sheathing, or structural components beneath
- The flashing failures are occurring alongside widespread shingle deterioration
The important distinction is between a sealant application over a visible gap — which is a temporary measure — and a proper re-flashing that addresses the assembly correctly. The first buys time. The second solves the problem.
What Proper Flashing Repair Actually Involves
This is worth clarifying because it is commonly misunderstood.
Running a bead of roofing caulk over a visible gap at chimney flashing or a step flashing joint is not a repair. It is a temporary patch. Sealant applied over a gap in a compromised assembly will last a fraction of the time that properly installed flashing would — and the underlying problem remains.
Proper flashing repair or replacement involves:
- Removing the affected section of shingles and existing flashing material
- Evaluating the condition of the decking and sheathing beneath
- Installing correctly sized and sequenced flashing components in the proper layered order
- Re-integrating with surrounding shingles correctly
- Applying sealant only where the assembly calls for it, not as a substitute for proper mechanical installation
This is why flashing work is often more involved — and more consequential — than its small physical scale might suggest.
Roof_Flashing_Fundamentals
Download this PDF to learn more – Roof Flashing Fundamentals
Frequently Asked Questions
How long does roof flashing last? Quality metal flashing properly installed can last 20–30 years. Sealants used with flashing systems typically need attention well before that — often within 10–15 years in South Jersey’s climate.
Can I see flashing failure from the ground? Sometimes — at the eaves, along visible valley lines, or at obvious chimney separations. But many flashing failures are not visible without getting on the roof and examining transitions and penetrations directly.
Is a flashing leak an emergency? Active water intrusion into the living space warrants prompt attention regardless of source. A flashing failure that is allowing moisture into the attic or wall cavity without obvious interior signs is serious but not always an emergency — though it does warrant scheduling an inspection rather than waiting.
Why does my roof leak only in certain rain conditions? Wind-driven rain, heavy sustained rainfall, and rain arriving from specific directions can expose flashing gaps that are not apparent during light rain. If a leak only occurs under certain weather conditions, a flashing issue is a common explanation.
How do I know if my chimney flashing needs repair or full replacement? The condition of the metal — whether it has structural integrity or has corroded significantly — and the condition of the full assembly determine the right approach. A professional inspection of the chimney flashing from the roof surface is the only reliable way to assess it accurately.
What to Do If You Suspect a Flashing Problem
If your South Jersey home has an active leak, staining that appears near a chimney or dormer, or a roof that is 15 years or older and has never had a flashing evaluation, scheduling a professional inspection is the right starting point.
A thorough inspection will identify which flashing assemblies are performing, which have failed or are failing, and what level of attention each requires — without assumptions in either direction.
T.A. Hughes III Roofing offers free, no-obligation roof inspections for homeowners throughout Burlington, Camden, and Gloucester Counties.
T.A. Hughes III Roofing is a family-owned exterior remodeling contractor serving South Jersey for over 45 years. The company is fully licensed and insured in the State of New Jersey and holds GAF Certified Roofing Contractor status.