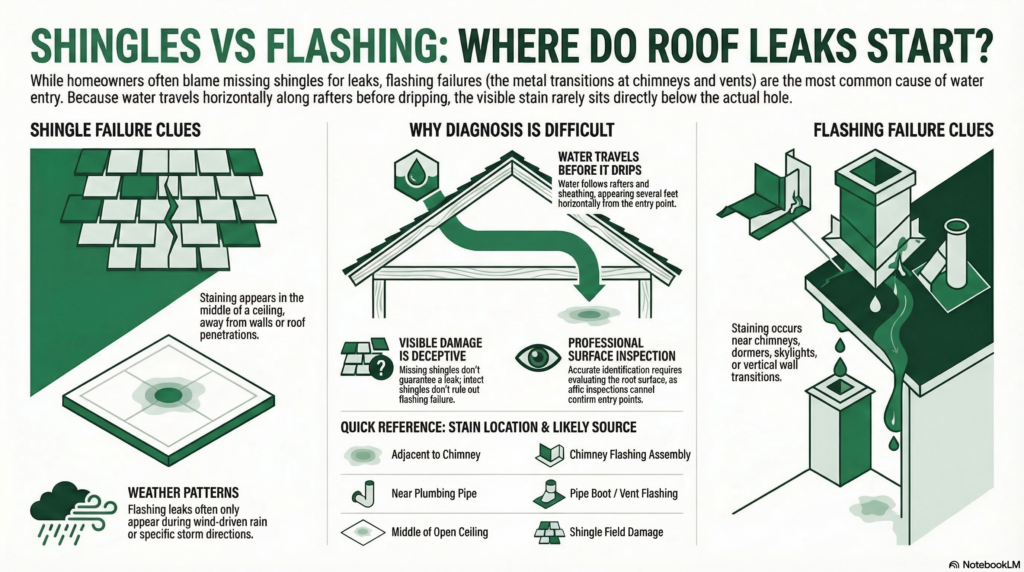
The location of interior staining, when the leak occurs, and what is directly above the affected area are the primary clues that help distinguish a shingle leak from a flashing failure. In South Jersey, flashing failures are responsible for the majority of roof leaks on homes with otherwise intact shingles — which means misidentifying the source leads to repairs that don’t solve the problem.
Key Takeaways
- Leaks near chimneys, dormers, walls, vents, and skylights almost always originate at flashing rather than shingles
- Leaks that occur only during wind-driven rain or specific storm conditions are a strong indicator of a flashing gap rather than shingle failure
- Water travels before it drips — interior staining rarely appears directly below the actual entry point
- Visible shingle damage does not confirm the leak source, and the absence of visible damage does not rule one out
- Accurately identifying the source requires a professional inspection from the roof surface — not from the attic or the interior alone
A roof leak is stressful. Once you find the water stain on the ceiling or the damp patch on the wall, the natural instinct is to look up at the roof and search for something obviously wrong. Sometimes you find a missing shingle. More often, you find nothing obviously damaged at all — and the leak continues.
The reason this happens so frequently in South Jersey is that most roof leaks do not come from the shingle surface. They come from flashing — the metal components at transitions and penetrations. And distinguishing one from the other is not always straightforward without knowing what to look for.
This article explains how to read the clues a leak leaves behind and why accurate source identification matters before any repair is attempted.
https://www.youtube.com/watch?v=2vHtDL4cTt8
Why This Distinction Matters
Repairing the wrong component does not fix a leak. It delays finding the actual source while the water continues entering — and while whatever is getting wet continues to deteriorate.
A homeowner who sees a ceiling stain near a chimney, finds no visibly missing shingles, and applies roofing caulk to the visible flashing gap may slow the leak temporarily. But if the actual failure is in the step flashing sequencing behind the siding above the roofline — which the caulk did not reach — the water keeps coming in.
Getting the source right the first time is the only path to an actual repair.
Reading the Clues: What the Leak Pattern Tells You
Where the Interior Staining Appears
This is the first and most telling piece of information — but it has to be interpreted carefully.
Water does not fall straight down from its entry point. It follows the path of least resistance, traveling along rafters, dripping down the underside of sheathing, running across insulation, and collecting at a low point before dripping into the living space. By the time it appears on a ceiling or wall, it may have traveled several feet horizontally from where it entered the roof.
That said, location still provides useful directional clues:
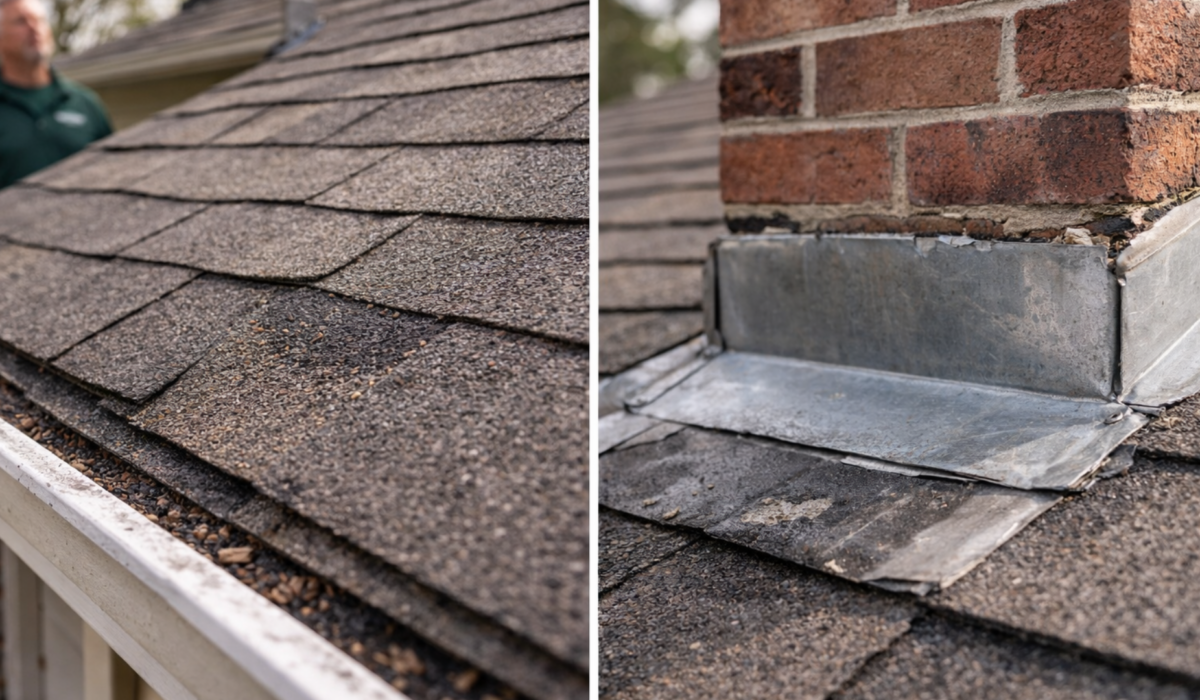
Staining near a chimney — on the ceiling adjacent to the chimney, on the wall below it, or on the ceiling a foot or two away from it — points strongly toward chimney flashing rather than shingles. Chimneys are among the most complex flashing assemblies on a roof, and flashing failures at chimneys are among the most common leak sources in South Jersey.
Staining near a dormer, wall, or addition points toward step flashing at that transition. The junction where a vertical wall meets a roof slope is a consistent failure point on older homes throughout Burlington, Camden, and Gloucester Counties.
Staining near a vent, skylight, or pipe points toward the flashing or boot at that penetration. Pipe boot failures are particularly common on roofs 15 years or older and are a leading cause of leaks that have no obvious shingle explanation.
Staining in the middle of a ceiling, away from any wall or penetration, is where shingle damage becomes a more plausible source — particularly if missing shingles, cracked shingles, or visible surface deterioration is present in the area directly above.
When the Leak Occurs
The conditions under which a leak appears provide important diagnostic information.
Leaks that occur only during wind-driven rain — when rain is coming in at an angle rather than falling straight down — are a strong indicator of a flashing gap. Vertical rain may not reach or pressurize the gap enough to cause water entry. Wind-driven rain arrives at an angle that forces water directly into the opening.
This pattern is particularly common in South Jersey after Nor’easters and thunderstorms with strong directional winds. Homeowners often describe a leak that only happens in certain storms or when wind comes from a specific direction. That is a flashing signature, not a shingle one.
Leaks that occur during any rain, regardless of conditions, are more consistent with a shingle failure — a gap in coverage through which even vertical rainfall passes.
Leaks that appear only during heavy sustained rainfall may indicate a valley issue, where the volume of water concentrated in the channel exceeds the capacity of failing or compromised valley flashing.
Leaks that appear during snow melt or ice events are often related to ice damming — a ventilation and insulation issue rather than a shingle or flashing failure — but can also expose existing flashing vulnerabilities as meltwater backs up under shingles.
What Is Directly Above the Affected Area
Once interior location and leak timing are noted, the next step is identifying what is directly above — and slightly upslope from — the stained area.
If any of the following are within several feet upslope of where the staining appears, they are the most likely candidate sources:
- A chimney
- A dormer or vertical wall transition
- A plumbing vent pipe
- A skylight
- An exhaust vent or attic fan
- A valley where two roof planes meet
- A previous repair location
If none of these are present and the affected area sits in the middle of an uninterrupted shingle field, shingle damage or severe granule loss with exposed asphalt becomes the more likely explanation.
What Visible Shingle Damage Does and Doesn’t Tell You
Finding a missing or visibly cracked shingle on the roof does not automatically confirm it is the leak source. This is one of the most common diagnostic errors made without a thorough inspection.
A missing shingle in one location may be completely unrelated to a ceiling stain in another area. Wind can remove shingles from sections that are draining fine while a failed pipe boot in a completely different location is allowing water in. Acting on the visible shingle damage without evaluating the full roof can result in a repair that addresses real damage — but not the leak.
The reverse is equally important: the absence of visible shingle damage does not rule out a leak. A roof can have fully intact shingles everywhere visible from the ground and still be leaking through a flashing separation that requires getting on the roof to see.
This is why visual assessment from the yard, while useful for flagging obvious problems, is not a reliable method for identifying a leak source.
The Attic as a Diagnostic Tool
If your home has accessible attic space, the attic can provide useful information — but it has limitations.
What the attic can show:
- Active water staining or wet spots on rafters and sheathing that help narrow the area of entry
- The general direction from which moisture is traveling
- Whether moisture has been present for a long time or is a recent development based on stain patterns
What the attic cannot reliably show:
- The exact entry point, because water travels along structural members before dripping
- Whether the source is flashing or shingles — both can produce similar attic moisture patterns
- The condition of flashing components on the exterior surface
Attic inspection is a useful starting point that narrows the search area. It does not replace evaluation of the roof surface itself.
Why a Professional Inspection Is the Reliable Answer
Homeowners can read the clues and form reasonable hypotheses about a leak source. A professional inspection confirms or corrects those hypotheses by evaluating the actual condition of every potential source location on the roof.
A thorough inspection for a suspected leak includes:
- Systematic evaluation of all flashing assemblies in the area indicated by interior signs
- Close inspection of pipe boots and vent flashing at and above the affected area
- Assessment of shingle condition across the relevant sections
- Attic observation correlated with exterior findings
- Documentation of what is found at each location
This approach distinguishes between the likely source and the confirmed source — which is what determines whether a repair actually works.
In South Jersey, where aging homes from the 1980s and 1990s commonly have multiple flashing components approaching or past their serviceable life simultaneously, a leak investigation sometimes reveals that the visible entry point is one of several areas that warrant attention. Knowing the full picture allows for informed decisions about repair scope and timing.
Common Misdiagnoses and What Actually Caused the Leak
These are patterns that come up consistently during inspections on South Jersey homes.
“I found a missing shingle — that must be it.” Possibly. But if the staining is near a wall, vent, or chimney rather than in the open field below the missing shingle, the flashing at that transition deserves equal or greater attention before assuming the shingle is responsible.
“I caulked the chimney flashing and the leak came back.” Caulk applied over a visible gap at chimney counter flashing addresses the surface but not the assembly. If the counter flashing has separated from the masonry or if the step flashing behind the siding is compromised, surface sealant will not reach the actual entry point.
“The leak only happens in bad storms — it must not be serious.” Intermittent leaks at flashing gaps still allow water entry that accumulates in decking and structural components over time. Intermittent does not mean minor.
“There’s nothing wrong with the shingles — the inspector must have missed something.” When shingles look intact but leaks continue, flashing is the first place a systematic inspection focuses. Intact shingles and active leaks coexist routinely on homes with aging flashing systems.
Repair Implications: Why Source Identification Comes First
The repair approach for a shingle failure and a flashing failure are fundamentally different.
Replacing or patching damaged shingles addresses a shingle source. It does nothing for a flashing gap.
Re-flashing a chimney, step flashing transition, or pipe boot addresses a flashing source. It does nothing for exposed asphalt across the shingle field.
Applying caulk to a visible flashing gap is a temporary measure that may slow but rarely eliminates a flashing leak — and is not a substitute for properly re-flashing the assembly.
Getting the diagnosis right before work begins is not a procedural detail. It is what determines whether the repair solves the problem or simply delays finding it.
Roof_Leak_Source_Identification
Download this PDF – Roof Leak Source Identification
Frequently Asked Questions
Can a roof have both a shingle problem and a flashing problem at the same time? Yes — and on older South Jersey roofs it is common. Multiple components can be failing simultaneously. A thorough inspection identifies all of them so repair or replacement decisions account for the full picture.
If I fix the flashing and the leak continues, what else could it be? If a confirmed flashing repair is done correctly and leaking continues, the next most likely sources are a separate flashing assembly in a different location, a pipe boot, or — less commonly — shingle damage that was not the primary focus of the initial repair.
Is it possible for a brand new roof to leak at the flashing? Yes. Flashing installation errors on a new roof can produce leaks relatively quickly. If a new roof is leaking, flashing is among the first things a follow-up inspection should examine — particularly at chimney, wall, and skylight transitions.
How do I find a reliable contractor to identify a roof leak source? Look for a contractor who will get on the roof, evaluate all potential source locations systematically, and provide written documentation of findings before recommending repair work. A contractor who diagnoses from the ground or recommends replacement without a documented inspection warrants caution.
Does homeowner’s insurance cover flashing repairs? Coverage depends on the cause and the specific policy. Storm-related flashing damage may be covered. Age-related deterioration typically is not. A contractor documents findings — coverage decisions belong to you and your carrier.
If You Have an Active Leak or Suspect One
If your South Jersey home has an active leak, visible interior staining, or a roof that is 15 years or older without a recent professional evaluation, a thorough inspection is the right starting point.
An accurate diagnosis of the source — documented in writing — is what makes any subsequent repair worth doing.
T.A. Hughes III Roofing offers free, no-obligation roof inspections for homeowners throughout Burlington, Camden, and Gloucester Counties.
Schedule a free inspection to get a clear, accurate diagnosis of your roof’s condition.
T.A. Hughes III Roofing is a family-owned exterior remodeling contractor serving South Jersey for over 45 years. The company is fully licensed and insured in the State of New Jersey and holds GAF Certified Roofing Contractor status.